Sunday, September 16, 2012

Move in day only a month away!

Good news: our move-in date is only four weeks away! There is light at the end of the tunnel. Couldn't come soon enough... we had hit a wall before our contractors gave us the move date. All of our issues melted when we received the update. Hallelujah.


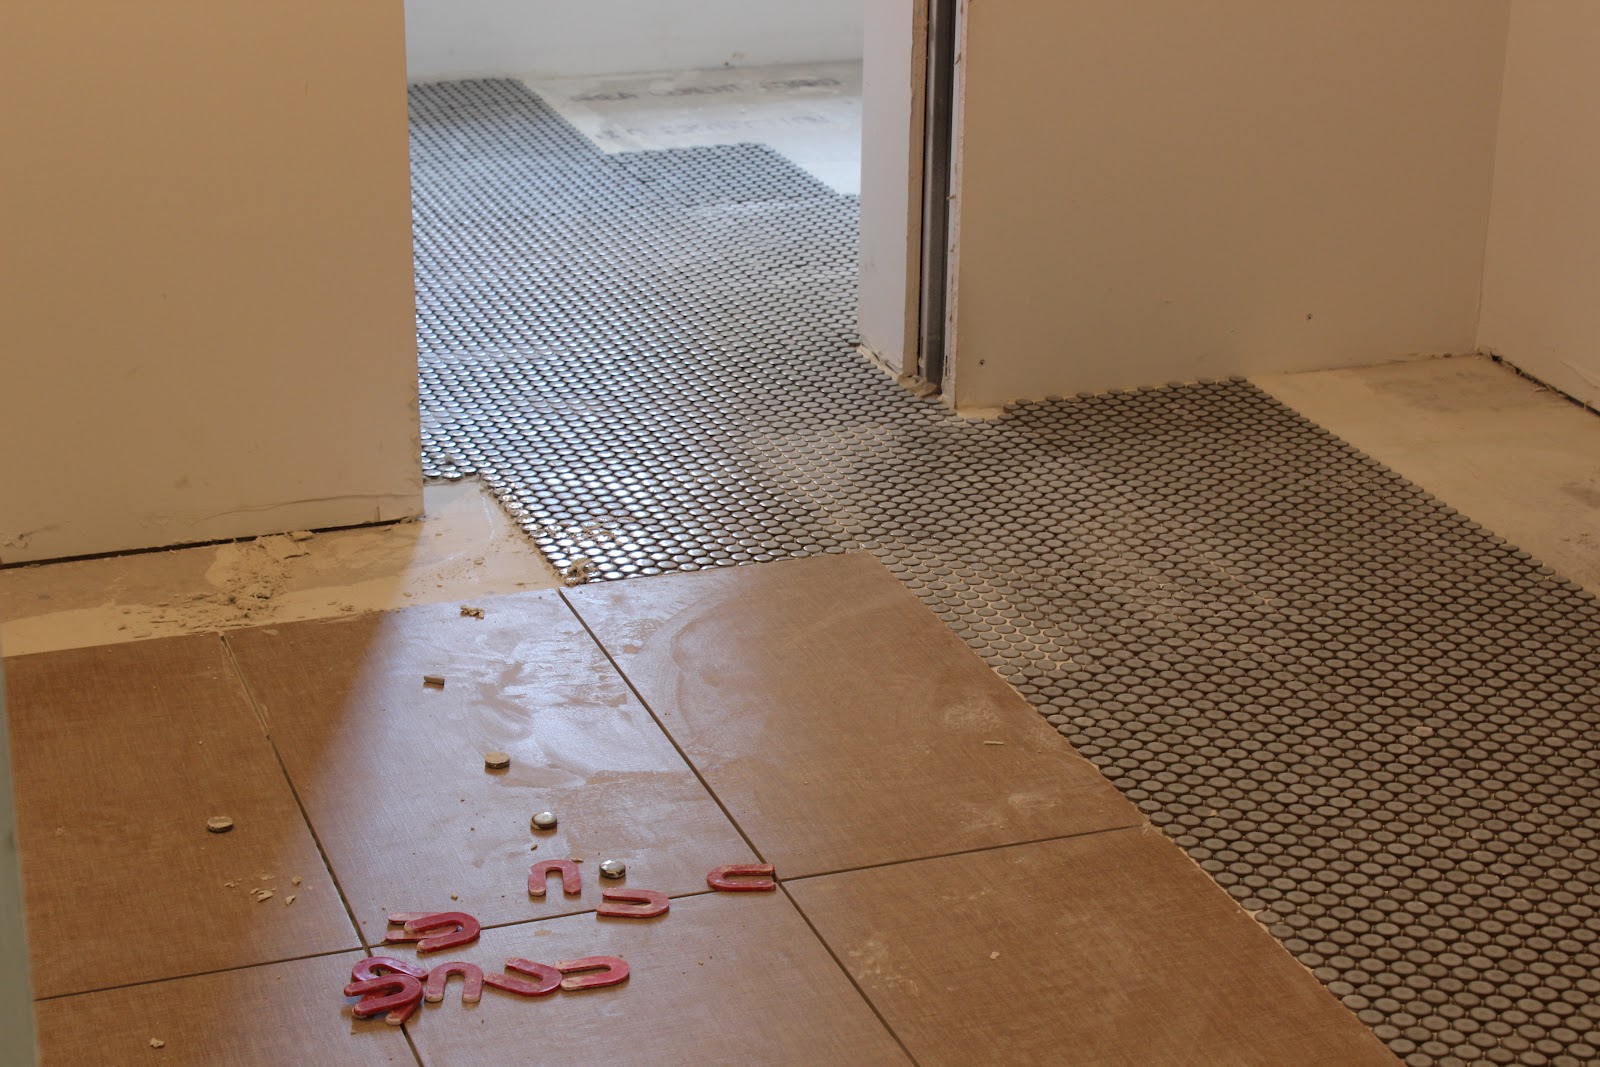
The kitchen cabinets have been fully installed. But they are covered with paper, along with the flooring, to protect them as the room will soon be painted.


The stairwell is progressing. Nearly all the railings have been installed. We only have a few gaping holes left. Our liability is lessening.


The steel stairwell will be painted black. And wood handrails will be added. New wood stair treads will be one of the last finishing touches.


This is one of our proudest additions: a shoe closet. I daydream about my Birkenstocks happily hibernating this winter. 


I chose Greenwich Green for one of the bedrooms. Brett wasn't sure about it initially, but, thankfully, it's not so bad. Phew! Dodged a bullet there.


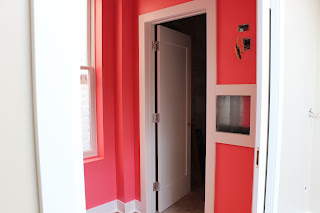
Now Florida Pink... (scratching my head) Yes, this was another one of my paint picks. But, it is for my little exercise room... and where else can one have a bright pink room? Don't judge.


In an effort to prep the basement, Brett has been busy building workbenches and shelving. The space is great for storage, but not much else. The ceilings are less than 6' tall and vary with every step. At 5'3", I am not in danger of hitting my head, but Brett's already broken a few light bulbs hanging from the ceiling. 


Look at the fantastic shelves Brett made. The 2x4s he used once lived in the building's walls and were salvaged during demo. My husband the carpenter and conservationist. Be still my heart.

Tuesday, August 28, 2012

More steel and a kitchen emerges...

It has been far too long since our last post. Far Too Long. Why, you may ask, have Karen & Brett neglected their Home Renovation Blog? This is a valid question. First, Brett's computer was under the weather. Since it holds all our pictures, that made updating the blog challenging. Once it was back in action, we were plagued with construction issues that mired us down, which prevented us from wanting to write about our project. Blah blah blah... enough excuses! Let's blog. 


The interior stairwell work has been extensive. It is not an easy task erecting steel stairs from nothing. Step one is to piece together all the steel stringers that were made offsite. Then, they make the landings or giant steel rectangles. That's what this guy is doing here.


After finishing the first set of steel stairs, they worked on the second stairwell. It was no easy feat. These guys worked long hours on hot days.


But after several weeks of arduous toiling, the stairs are in place with temporary treads. Railings are coming this week. But in the meantime, we have usable stairs. Sure beats schleping up makeshift ladders. And it's awfully nice walking up our future stairs.


Another exciting moment was the delivery of our kitchen cabinets. At long last... my dream kitchen! Unfortunately, the installation has been less than idyllic. While they are just as we had expected, they are not what our contractor had anticipated. A couple inches longer here... a few inches deeper there... sigh, our kitchen has not been easy to construct. Our main floor has looked like the above pictures for two weeks. Due to the extra cabinetry lengths, the knee walls were in the wrong locations. So, those had to come out. A couple of inches may not seem like much, but when it comes to construction, it's the difference between right and redo.


While the stairs were being installed inside, a few other steel guys were putting in the spiral stairs to the roof. Now don't go getting any crazy ideas... we aren't putting in a roof deck or anything fancy like that. This is just a stairwell to the roof for easy access to the air conditioners and to the skylight. 


Isn't this a cool photo? This is the tiling in the master shower. Brett picked out all the design aspects, including tiles, flooring, counters, sinks, paint, light fixtures. There isn't much more to show right now, but there will be...


And we have doors! Door trim too. I never knew I'd geek out over doors. Life sure is exciting.


Wednesday, August 8, 2012

The welding moves indoors... and more!

What a difference a week makes. Not only am I back from my trip to Canada refreshed, but I returned to many changes on the home front. I confess: I deeply missed watching the progress over those five days.

They patio guys finished installing the bricks from the front sidewalk, alongside the building and into the back courtyard. On one side of each brick, there is raised wording: Purington Paver. We really liked that aspect of the bricks, so when they were installed, the guys would occasionally make the wording visible.


The brick was laid in several inches of gravel substrate and topped by a layer of sand. After that, they were tamped into place with a gyrating Zamboni type machine that emitted earsplitting noise. Then, the bricks were cleaned with green acid. The only thing left is to add one last layer of sand to complete the patio.


Quite a bit of time and energy have been put into this back patio and stairwell. It is a relief to see it all come together. We are already planning how we're going to use the space and where we'll place outdoor furniture and a grill. 


Once the guys were done with the back stairwell, they moved their metalworking indoors to another set of stairs. Would you believe that this giant steel box is for our stairwell?


It is the landing for the first set of stairs and hovers above the kitchen counter. Yikes!


The stringers were installed also. We picked the wood and stain for the treads in order for the stairs to become functional. Right now, we are using the outdoor stairs to visit the second floor. 


Nothing reads hotter than welding. My pyro husband wants to try his hand at this.


The kitchen cabinets arrived! This was the first aspect of the home we designed. After extensive research and much window shopping, we created exactly what we wanted for ourselves and the space. We couldn't have done it without our friends at CulinaBlu (www.culinablu.com). Joyce was amazing to work with; she gave us her expertise and insight while also showing patience as we figured out what we actually wanted. These cabinets were custom made in Germany and delivered right to our home. 


All of the tile flooring was placed and grouted. They moved onto the tub, laying the white subway tiles.


Last but not least... the hardwood flooring is being installed. Brett and I spent a copious amount of time researching different options, debating every element: pre-finished vs. unfinished, oak vs. "exotic" woods, deep brown stains vs. light bleached colors, 3" vs. 5" width. Ultimately, we selected a beautiful carbonized stranded bamboo. The cocoa browns sate Brett, while the honey tones resonate for me. The various hues play well with the exposed brick, as shown in our future bedroom.

We were drawn to this flooring when we first started our research, but felt we needed to explore more. And at the end, we returned to this style. Lucky for us, it is especially durable too. It is pre-finished which has added some extra headaches; since it won't be sanded at the end of construction, our army of workers need to be mindful not to hurt it. Fingers crossed! 

Tuesday, July 31, 2012

Phase 7: Flooring, flooring everywhere (Guest Blogger Edition)

Brett here again! While Karen is out of town, I have been granted the blog reigns again. As her husband and the blog photographer, I am relieved to know my previous blog was up to snuff. Phew. 

The tile pros moved in this past week to continue the long road of finishing touches on our home. Here we see their command center where all tile is cut for the team of 4 people who are spread out in their respective workspaces.


Here is the work in progress for the Jack 'n Jill bathroom on the 2nd floor. The coloring is off in this photo due to a bright light coming thru the window but the end result here will be 12"x24" beige tiles with a discreet weave design as well as penny tiles (Brittany Misty from The Tile Gallery) for the remainder of the floor.


For the 3rd floor front bathroom, we have cement tiles installed from Granada Tile. With these tiles, the dyed cement is poured into a mold which makes the color very deep & rich as well as making them incredibly durable. The claw footed tub should look great hovering above these!


Moving to the master bathroom, we've used pebble tile for our shower floor (also from The Tile Gallery). These are actually stones taken from river beds and sorted to assemble the coloring that we desired. In the distance, we have wood-grain ceramic tiles although you can barely tell due to the dust that has settled over them because of work being done elsewhere! We are looking forward to keeping our toes warm with the imbedded heating pads underneath.


Moving outdoors, Levi inspects the sand pile which he assumes was probably put there for him to play in.


In reality, it is being used by the patio/walkway crew to provide a foundation for the bricks. Here we see an overhead shot of the raised area of the patio framed and ready for the bricks to be installed.


After the long journey to obtain the bricks and get them to the worksite, the installation has moved along pretty quickly over the past few days. Here we see the walkway leading from front of house to back. They look great even while framed by a port-a-potty and protective tarp.


Unfortunately, the rear stairwell progress continues to move at a snail's pace. We do have most of the railings installed but the floor is missing in many spots so you definitely have to watch your step!

Sunday, July 22, 2012

Phase 7: Primer never looked so good

With the drywall complete, the walls have been primed and are ready for finishing touches.


Levi is slowly getting accustomed to his future home. Although, he doesn't quite get it. He still runs up to the front windows looking for the cat that used to live here.


These pieces of wood are our old newell posts. We want to do something cool with them. Anyone got a suggestion?


A couple more photos of the rooms. They clean up nicely. Now, we just need some doors.


The tile is beginning to be installed. The flooring in the mechanical room is in place, waiting to be grouted. 


The cement in the master bathroom shower has been poured. Next week, we should have tile too.  


The back stairwell is coming along, but at a much slower pace than originally laid out. Brett & I were told it would take 2 weeks total; all the pieces were supposed to arrive already pre-constructed to make for easy installation. Unfortunately, that has not been the case. They have already spent 4 weeks on the stairs and, as you can see, they are probably 2/3 finished. They still need to install most of the railings and the treads. #Fail.


This is an interesting view of the back patio door. The new brick door framing is vertical, adjacent to the horizontal brick. But, just above that, you can see the former back door arch in the brickwork. It hints at what once was.


As you can imagine, Brett and I have bought a ton of fixtures and elements, read: tile, sinks, bath hardware, etc. Bobby, our contractor, has kindly and patiently housed most items in his office. They take up a fair chunk of room. Bobby is 6'2" and our pile is nearly as tall as he is. I'm sure he's looking forward to getting that space back. Soon, Bobby, very soon.

Sunday, July 15, 2012

Guest Blogger Edition!!!

Hi there!  Karen is busy tonight so I (Brett) am going to guest-blog to provide the latest update.  I'm a blogging virgin so this may get a little messy.  

Our first photo is obviously not in Chicago so why is it here, you ask?  Well, a little background first.  We've been searching for brick for our patio and walkway for quite a while and we're rapidly approaching the installation phase.  Over the 4th of July holiday, we answered a Craigslist ad for a farm/silo that was being demo'd in Harvard, IL and this is what we found.  If you look closely, you can still make out the circular outline of the silo that stood here for 100+ years until being knocked down just recently.


The bricks look great and the company that makes them has an interesting history (http://www.historicalbricks.com/brick_history.html) so we are glad we held out and found exactly what we were looking for.  However, they're 9 pounds each and we hadn't exactly thought thru how to get nearly 3,000 of them from Harvard to Chicago.  After Karen spent several hours of hearing 'we can't help you' from various shipping and landscaping companies, I briefly contemplated moving them myself until Karen reminded me that I don't know how to operate a forklift and don't have a trucker's license.  And 50+ round-trips with the Toyota 4runner probably isn't very practical, either. 

Thankfully, we found a great little company who solved our dilemma.  Below, we see the full-size semi (13 tons of bricks requires a big truck!) being unloaded by Frenchie the truck driver.  And, yes, I asked Frenchie if I could drive but he wasn't letting me near either the 40-foot semi or the forklift.


Karen just checked on my blogging progress and said it was wordy.  The nerve.  Anyway, the City of Chicago likely would have frowned on us leaving the brick in the street so our buddies below were thrilled to move the 3,000 bricks one-by-one from the 11 pallets in 90 degree heat.....


To the front of our home where they sit awaiting installation within the next week.


While the brick was delivered, the work elsewhere didn't cease.  Here we have a drywaller doing his thing sealing the seams between the drywall and getting it ready for painting down the road.


One of the interesting aspects of this project has been working thru the low-voltage options (internet, cable, speakers, etc).  I talked to a few companies that happily provided quotes of literally several hundred thousand $'s to install every possible gizmo.  They didn't get a return call from me but I was able to borrow some ideas and decided to design a low voltage set-up myself.  After our electrician executed that wiring plan, here is a photo of the result in the office.  I sure hope it works!


In the meantime, the steelwork continues on the back patio stairwell....


Here we have two pros hard at work.  On the left, preparation of the next steel I-beam is done while, behind him, VERY LOUD jackhammering of the old concrete patio is underway.


Another exciting development over the past week was a 6' x 6' hole cut in the 3rd floor ceiling.


Thankfully, these guys work fast because the skylight was installed in that hole in advance of the crazy, recent storms.  Below we have a photo of the beautiful blue skies over the weekend.  The home design allows this natural light to illuminate all 3 floors.


 Thanks for reading and Karen will be back next week!